Hunting a Business Email Compromise: A Splunk Investigation
June 27, 2026 • Incident Response

A hands-on walkthrough of investigating a credential phishing attack and account takeover at Nexus Financial from suspicious sign-in alert to full attacker timeline, using Splunk, Entra ID logs, and Microsoft 365 audit trails.
Hunting a Business Email Compromise: A Splunk Investigation
Scenario: Nexus Financial. A Finance Manager's account just got flagged. Your job is to find out what happened, how bad it is, and who else got hit before the attacker moves deeper.
Setting the Scene
Marcus Webb, a SOC analyst at Nexus Financial, escalated a suspicious sign-in alert. The affected account belongs to Laura Chen a Finance Manager. The sign-in happened outside the UK which is a big red flag since the company operates from there.
Here's what Marcus handed over:
| Field | Value |
|---|---|
| Alert Name | Anomalous Sign-in Detected |
| Time | 2026-03-30 16:41:30 |
| Affected Account | l.chen@nexusfinancial.thm |
| Corporate IP | 197.32.45.112 |
All Microsoft 365 logs are ingested into Splunk under index=ir. We have three log sources to work with:
| Log Source | Sourcetype | What It Tells Us |
|---|---|---|
| Entra ID Sign-in Logs | azure:aad:signin | Who logged in, from where, and when |
| Message Trace | o365:reporting:messagetrace | Emails delivered, sender, subject, status |
| Unified Audit Logs | o365:management:activity | Actions taken inside M365 (rules, file access, etc.) |
This is a two-phase investigation: Detection (confirm and trace the attack) then Analysis (understand full scope and impact).
Phase 1 Detection: Finding the Attack
The first job is simple: validate Marcus's alert. Don't trust the ticket blindly go to the logs yourself and confirm it.
Q1: What IP address did the suspicious sign-in come from?
Where to look: azure:aad:signin this is your Entra ID (formerly Azure AD) authentication log. Every sign-in attempt, successful or failed, lands here.
The logic: We know the account (l.chen@nexusfinancial.thm), so filter on that and pull distinct IP addresses. If we see anything that isn't the corporate IP (197.32.45.112), that's our suspect.
splindex=ir sourcetype="azure:aad:signin" userPrincipalName=l.chen@nexusfinancial.thm
| table createdDateTime, src_ip
| dedup src_ip
dedup src_ip is key here Laura likely had multiple sign-ins from her legitimate IP. We want the unique list so the anomaly stands out clearly.
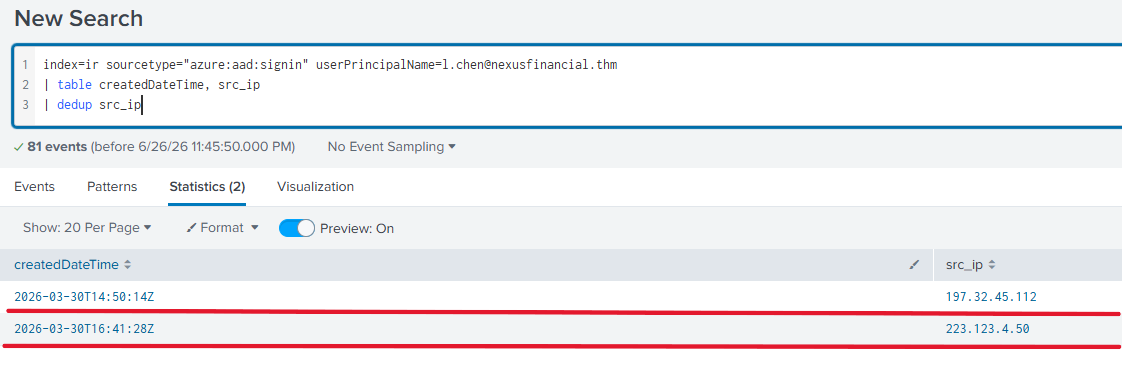
Result: You'll see the corporate IP, and one foreign IP that doesn't belong: 223.123.4.50.
Q2: What city did the suspicious sign-in originate from?
Now that we've got the attacker's IP, we pivot on it. Add it as a filter and pull the geolocation fields Entra ID enriches automatically.
splindex=ir sourcetype="azure:aad:signin" userPrincipalName=l.chen@nexusfinancial.thm src_ip=223.123.4.50
| table createdDateTime, src_ip, location.city
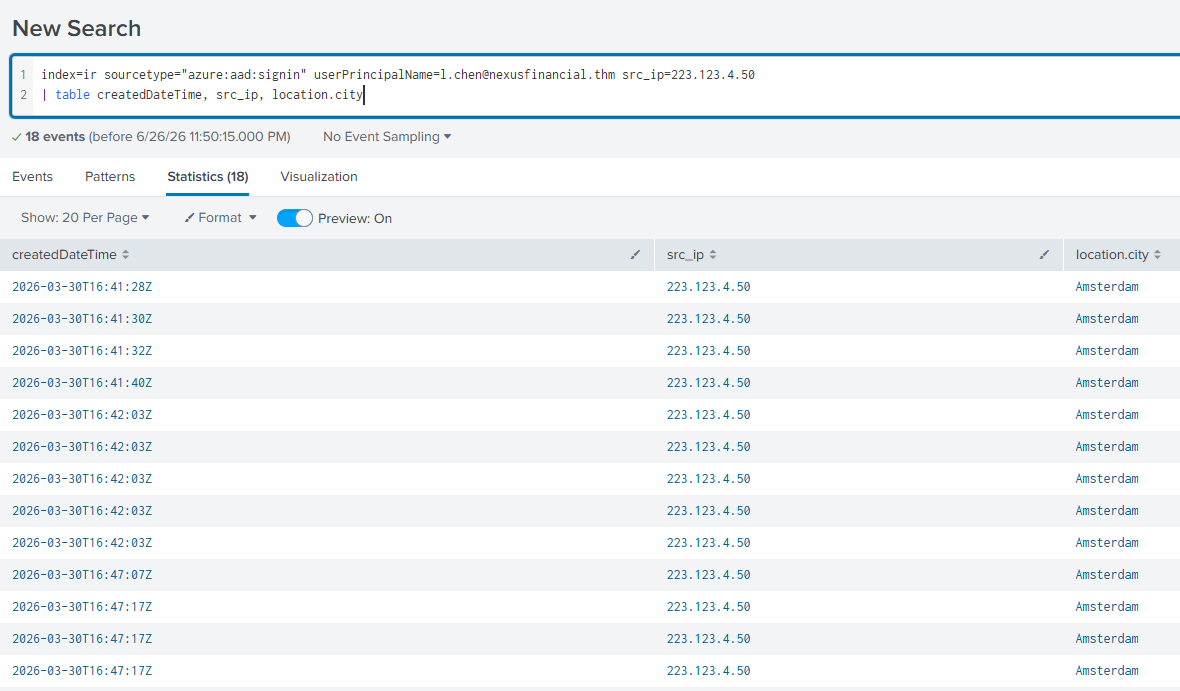
Result: The sign-in originated from Amsterdam, Netherlands. That's the attacker's apparent location or at least the exit node they used.
Q3: What was the exact timestamp of the first suspicious sign-in?
Now we want the timeline. When exactly did the attacker first get in? We filter on Laura's account and the Amsterdam city field, then look at the createdDateTime column in chronological order.
splindex=ir sourcetype="azure:aad:signin" userPrincipalName=l.chen@nexusfinancial.thm location.city=Amsterdam
| table createdDateTime, src_ip, location.city, appDisplayName, action
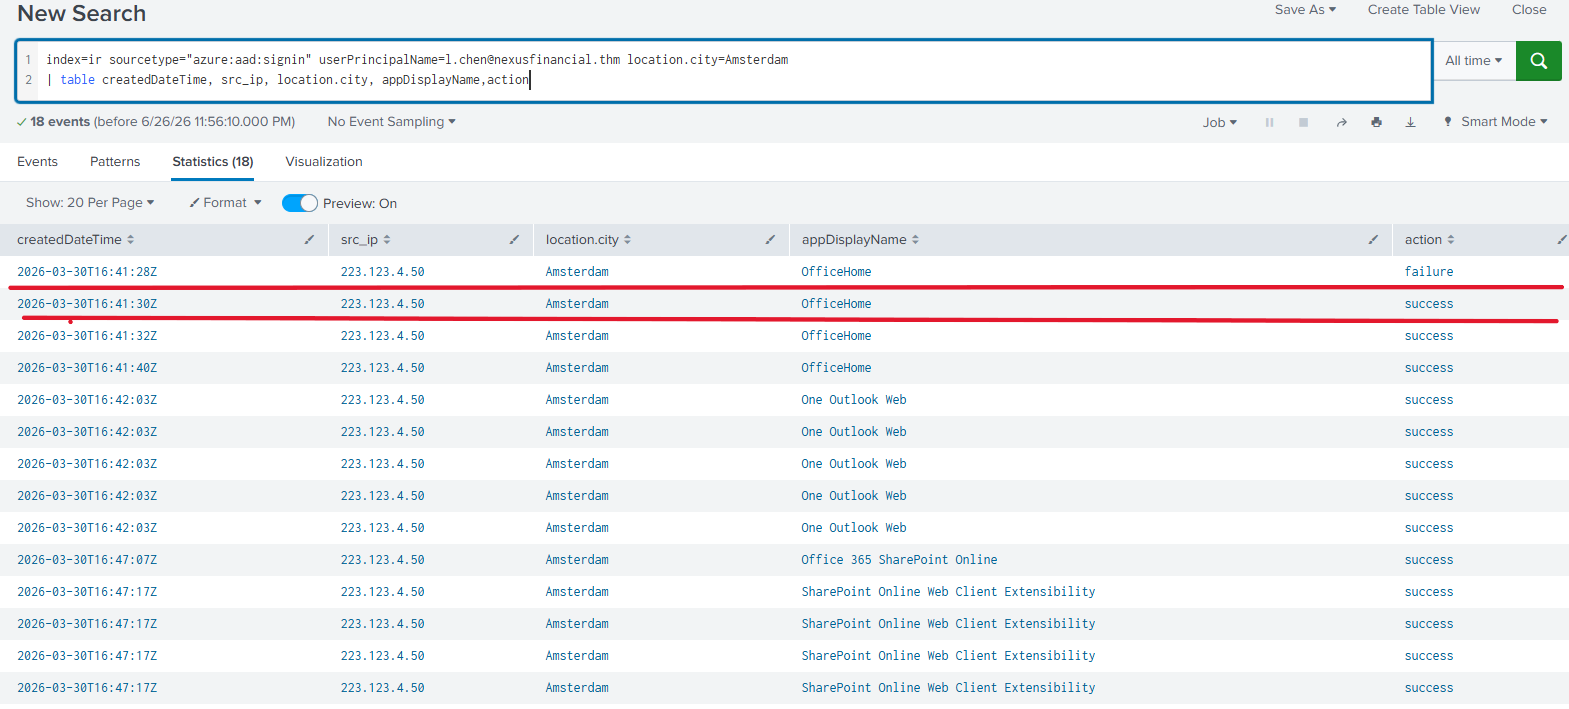
Look at the results carefully you'll likely see some failed attempts (wrong password guesses) before a successful sign-in. The first successful one is your answer. That pattern of failures followed by success is a classic credential stuffing or phishing → login sequence.
Q4: What was the subject line of the email Laura received before the sign-in?
This is where the investigation gets interesting. How did the attacker get Laura's credentials? The most common answer in business environments: a phishing email.
We pivot to o365:reporting:messagetrace the email delivery log. We filter by the attacker's IP (223.123.4.50) to see if they also sent Laura an email before they used her credentials. This is correlation connecting two different log sources through a shared indicator (the IP address).
splindex=ir sourcetype="o365:reporting:messagetrace" FromIP=223.123.4.50
| table Received, SenderAddress, RecipientAddress, Subject, Status, FromIP
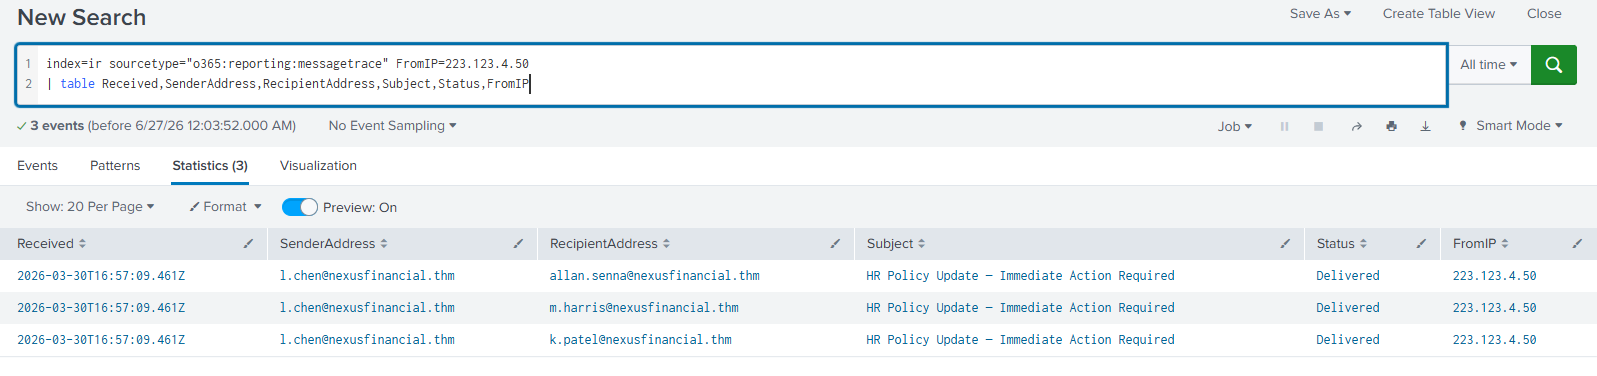
Result: You'll find an email delivered to Laura before the sign-in timestamp. The subject line is your answer. This confirms the attack sequence: phish sent → credentials harvested → account accessed.
Q5: What was the sender domain of the phishing email?
The logic: Now we nail down the phishing infrastructure. We use the subject line we just found as our filter to isolate that specific email and inspect the sender address.
splindex=ir sourcetype="o365:reporting:messagetrace" Subject="HR Policy Update — Immediate Action Required"
| table Received, SenderAddress, RecipientAddress, Subject, Status, FromIP
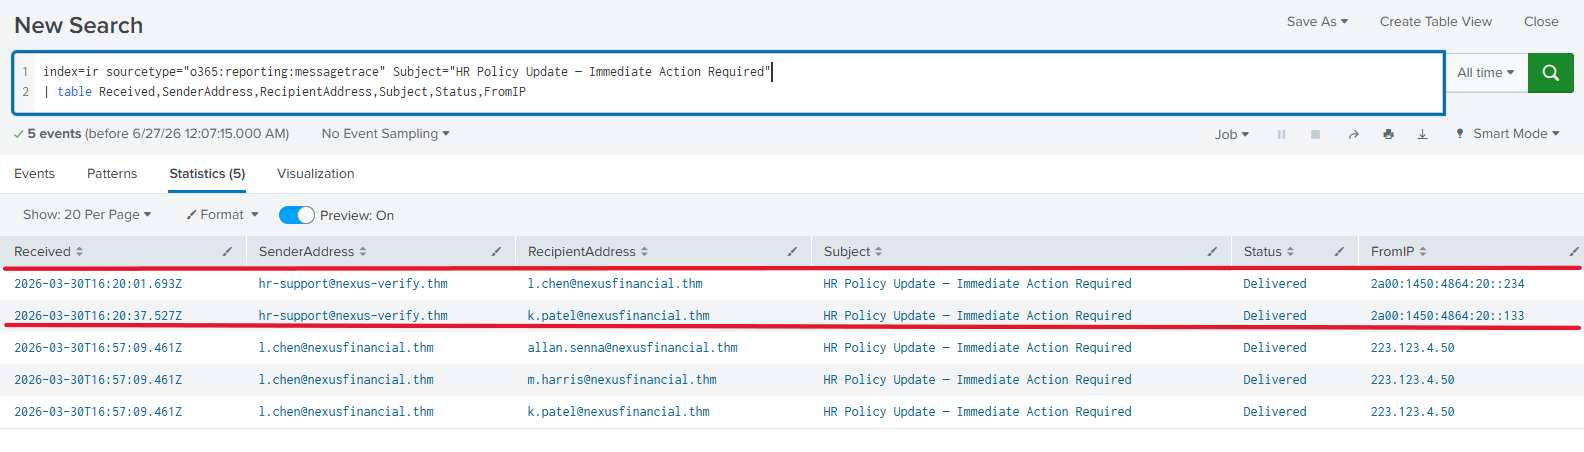
Check the SenderAddress field the domain after the @ is your phishing domain. It'll look legitimate at a glance (impersonating HR or a trusted internal team), but it won't be @nexusfinancial.thm.
At this point, the detection phase is complete. We've confirmed:
- The suspicious IP
- The attacker's location
- When they first got in
- How they got Laura's credentials (phishing email)
- The phishing infrastructure they used
Phase 2 Analysis: How Deep Does This Go?
Detection tells you what happened. Analysis tells you how bad it is. Now we expand the scope.
Q1: How many Nexus Financial accounts show sign-in activity from the attacker's IP?
The attacker sent one phishing email we know about but probably not just one. Search all sign-in logs for that IP across all accounts, not just Laura's.
splindex=ir sourcetype="azure:aad:signin" src_ip=223.123.4.50
| stats count by userPrincipalName
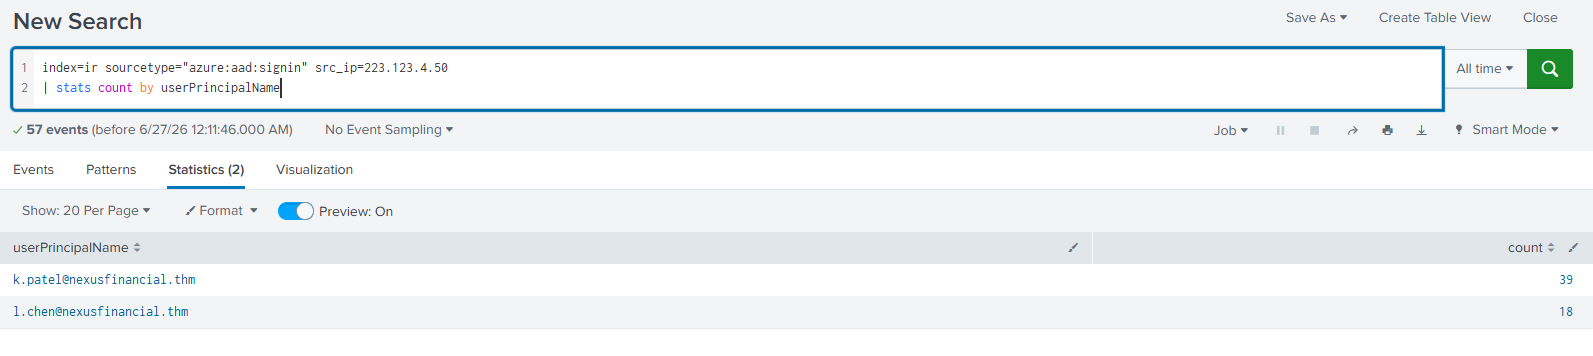
Result: Two accounts show activity:
l.chen@nexusfinancial.thm—> 18 eventsk.patel@nexusfinancial.thm—> 39 events
So the attacker compromised 2 accounts. K. Patel's account had significantly more activity (39 vs 18), which suggests deeper post-compromise actions there. That's a priority for further investigation.
Q2: What inbox rule did the attacker create on Laura's account?
This is a textbook move. After gaining access to a mailbox, attackers often create inbox rules to:
- Hide replies to their phishing emails (delete or move them out of inbox)
- Forward a copy of incoming email to themselves
- Suppress security alerts from IT
Switch to the Unified Audit Log (o365:management:activity) which tracks admin-level actions inside M365. Filter on Laura's account and the New-InboxRule operation.
splindex=ir UserId=l.chen@nexusfinancial.thm sourcetype="o365:management:activity" Operation=New-InboxRule
| table Operation, ObjectId
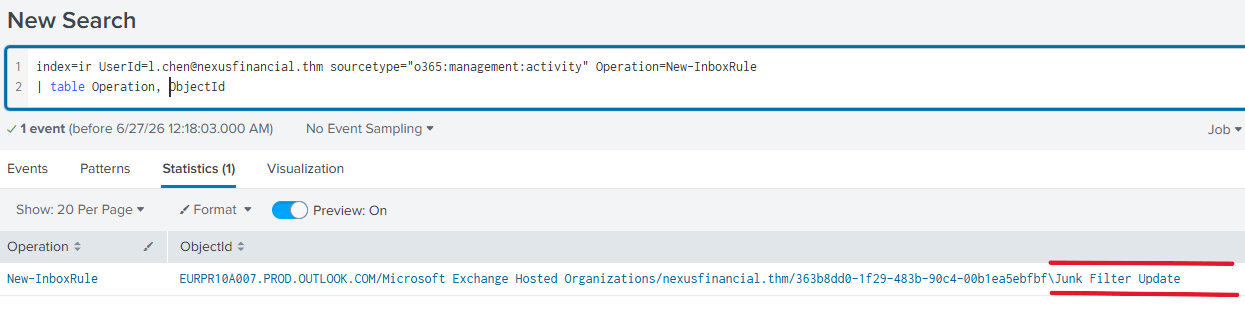
The ObjectId field will show you the rule name. Whatever it's called, it was put there by the attacker to maintain persistence or cover their tracks.
Q3: How many employee accounts received the original phishing email?
We need to know the full delivery scope of the phishing campaign. Switch back to the Unified Audit Logs and search for activity from the attacker's IP across all users this gives us everyone who was targeted, not just those who clicked.
splindex=ir src_ip=223.123.4.50 sourcetype="o365:management:activity"
| table UserId
| dedup UserId
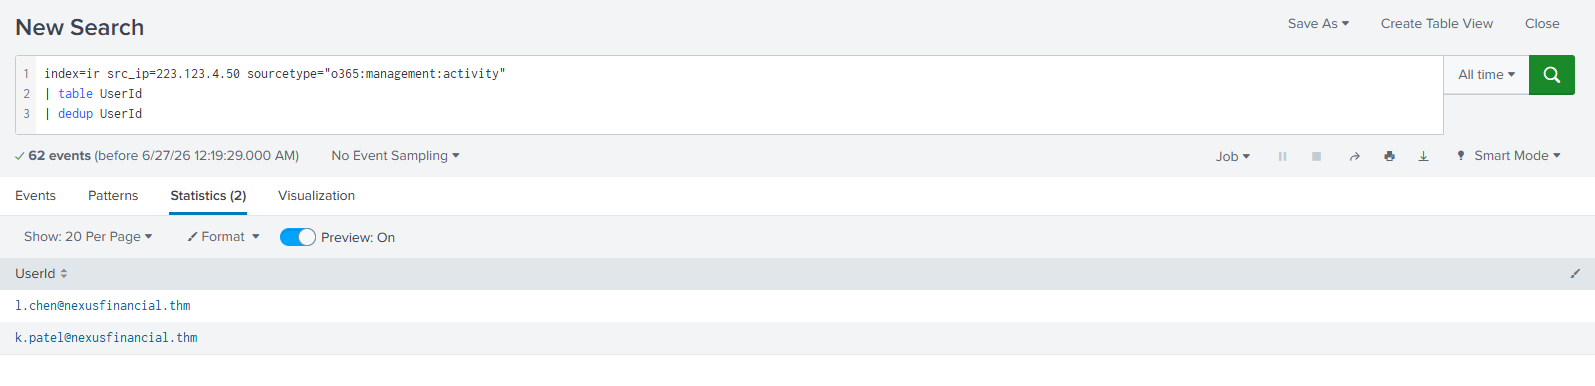
This count tells you the total blast radius of the initial phishing wave. Every account in this list needs to be reviewed even if they didn't sign in from Amsterdam, they may have clicked a link and entered credentials into a fake page that wasn't captured in these logs.
The Full Attack Chain
Let's tie it all together into one coherent story:
[1] Attacker crafts phishing email
         |
         v
[2] Email delivered to multiple Nexus Financial employees
    (including Laura Chen and K. Patel)
    Subject: "HR Policy Update — Immediate Action Required"
    From IP: 223.123.4.50 (Amsterdam)
         |
         v
[3] Laura Chen clicks link, enters credentials on fake page
         |
         v
[4] Attacker logs in from 223.123.4.50
    First successful sign-in confirmed in Entra ID logs
         |
         v
[5] Attacker creates inbox rule on Laura's account
    (hide security alerts / delete suspicious replies)
         |
         v
[6] Attacker also accesses K. Patel's account
    39 events recorded deeper activity, needs further investigation
Key Takeaways for SOC Analysts
A few things worth highlighting from this investigation that apply beyond just this scenario:
Cross-source correlation is everything. The phishing email and the sign-in event were in completely different log sources. Connecting them through the shared IP address is what built the complete picture. If you stayed in one sourcetype, you'd only have half the story.
Look at what happened after the login, not just the login itself. The inbox rule creation is the kind of thing analysts miss when they close the ticket after confirming the initial compromise. Post-compromise actions reveal intent and persistence mechanisms.
One alert usually means multiple victims. When you find an attacker's IP in sign-in logs, your first instinct should be to expand the search across all users immediately. The 39 events on K. Patel's account suggest that was actually the more serious compromise of the two.
Timestamps matter. Always establish the sequence: email delivered → sign-in → inbox rule created. If the timeline doesn't make sense, you've got the wrong hypothesis. The logs don't lie but they need to be read in order.
This walkthrough is based on a TryHackMe scenario simulating a real-world Business Email Compromise (BEC) investigation. All company names, accounts, and IP addresses are fictional.